Inquiry Forms Overview
Cortado’s inquiry form is an embeddable lead-capture form designed for event businesses. It runs as a hosted experience and drops into your website with a small snippet — visitors fill it out, a new inquiry lands in your Leads Pipeline, the submitter becomes a contact, and your team gets notified. Everything about the form is configured under Settings > Communications > Inquiry Forms in your Cortado admin. That page is organized into five sub-sections, each covered below:- Embed Form — copy the snippet that drops the form onto your website
- Form Options — choose which add-on items appear on the form
- Customization — your post-submission success message and optional redirect URL
- Google Analytics — attach a GA4 Measurement ID and Google Ads conversion label
- Unavailable Dates — block specific dates on the date picker
The “Inquiry CC Email” — the secondary address that receives a copy of every new inquiry notification — is not under Inquiry Forms. It lives under Settings > Company > General as the Inquiry CC Email field.
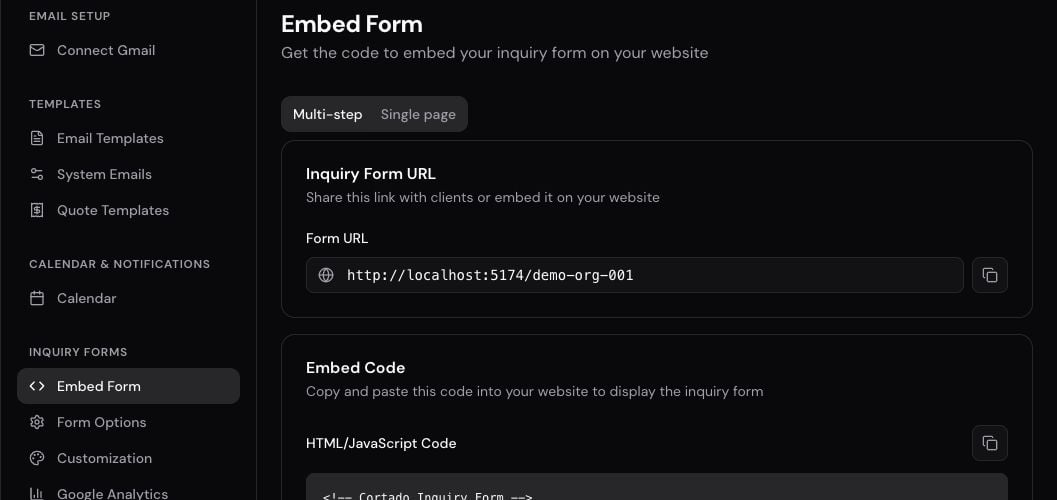
Embed Form
The Embed Form sub-section gives you the code snippet to paste into your website. There are two layouts to choose from, and you can copy the snippet for either one from a tab on the page.Multi-step vs Single-page
- Multi-step wizard — walks the visitor through four steps: event basics, services, add-ons, and contact info. Best for longer forms where you want to ease the visitor in.
- Single-page — every field is visible at once on a single scrollable page. Best for short forms or when visitors prefer to see the whole thing up front.
The Embed Snippet
Each form gets a unique target id. Paste this snippet into your website wherever you want the form to appear:data-single-page attribute controls the layout — false for the multi-step wizard, true for the single-page version. The Embed Form page in Cortado generates the snippet with the right value selected for you.
Custom Subdomain
If a custom subdomain is enabled for your organization, your hosted form can live at a branded URL likeyourcompany.cortadopro.com instead of the shared forms.cortado.pro host. The subdomain uses your organization slug, which you set under Settings > Company > General.
When the custom subdomain is active, the embed snippet on the Embed Form page automatically uses your branded URL.
Re-copying the Snippet
The embed snippet loads a hosted script from Cortado, so most improvements ship automatically without you doing anything. Re-grabbing the snippet after a change is rarely necessary.Form Options
Form Options controls which add-on items from your catalog appear on the inquiry form.- Drag-and-drop reordering — set the order add-ons appear to the customer.
- Per-item include toggle — show or hide individual catalog items on the form without removing them from your catalog.
- Manage Catalog link — jumps directly to your catalog where you maintain the underlying items.
Customization
The Customization sub-section controls what visitors see after they submit the form.Success Message
Cortado ships with a default post-submission confirmation along the lines of “Thank you for your interest. We’ve received your inquiry…” — perfectly fine, but generic. Replace it with copy in your own brand voice:
If you want to go back to the original copy, click Use default text to revert.
Redirect URL
Instead of (or in addition to) showing the success message in place, you can send customers to a page on your own website after they submit — a thank-you page, a calendar booking link, or a next-step landing page.- The URL must be HTTPS.
- For embedded forms, Cortado redirects the host page (your website), not just the iframe — so the visitor lands on a clean full-page experience.
- On the standalone hosted form, the success screen flashes briefly before the redirect runs.
Google Analytics
The Google Analytics sub-section attaches your tracking IDs to the inquiry form. Both fields have their own Save and Reset buttons, so you can configure one without touching the other.- Google Tag Measurement ID — supports
G-,GT-, andAW-prefixes (Google Analytics 4, Google Tag, and Google Ads IDs respectively). - Google Ads Conversion Label — the full
AW-XXXXXXXXXX/abc_defformat from your Google Ads conversion action.
The Analytics setup, supported ID prefixes, event names, and Google Ads conversion walkthrough are documented in full in the Analytics guide below.
Set up Google Analytics & Google Ads
Step-by-step setup for GA4 Measurement IDs and Google Ads conversion labels.
Unavailable Dates
The Unavailable Dates sub-section lets you block specific dates from the form’s date picker — useful for blackout dates, sold-out weekends, holidays you don’t work, or any day you don’t want to take inquiries for.Blocking a Date
Add an optional reason
Type a short note — for example, “Closed for Thanksgiving” or “Owner traveling”. The reason is for your team’s reference and appears in the table; visitors don’t see it.
The Public Form Experience
This is what your customers actually see when they open your embedded form. Knowing how it behaves helps you preview your setup and explain it to your team.Layout
The form renders as a multi-step wizard or a single page depending on which embed snippet you used. Both layouts collect the same information:- Event basics (date, time, type)
- Services or event details
- Add-ons (hidden automatically if you haven’t configured any)
- Contact info (name, email, phone)
Mobile Pickers
On phones and small screens below the tablet breakpoint, the date and time pickers use the OS-native iOS and Android pickers — the same wheel and spinner customers know from every other app. On desktop, Cortado’s own calendar popover is used for a richer experience with month navigation and visible blocked dates.Past Dates
The date picker disables past dates automatically. Customers can’t accidentally submit an inquiry for a date that’s already passed.Source Attribution
Cortado automatically captures marketing attribution data on every submission:- UTM parameters —
utm_source,utm_medium,utm_campaign,utm_term, andutm_content - Google Click IDs —
gclidfrom Google Ads - Facebook Click IDs —
fbclidfrom Meta ads
Where Submissions Go
When a visitor submits the form, Cortado does several things in one step:- A new inquiry is created in the New stage of your Leads Pipeline.
- The submitter is captured as a contact in your CRM — or matched to an existing contact if the email is already on file.
- The captured event details, add-ons, and attribution data are attached to the inquiry.
- Notifications fire to your configured channels: Slack, email, and in-app — depending on what you’ve enabled.
Best Practices
- Test your form before going live — submit a test inquiry yourself to confirm the flow, then check that it appears in Leads, fires notifications, and (if configured) registers analytics events.
- Keep the form short — only ask for what you genuinely need to qualify the lead. Long forms convert worse, and you can collect more details later by phone or email.
- Customize the success message — replace the generic default with copy in your brand voice and set expectations on what happens next (for example, “We’ll be in touch within 24 hours”).
- Block unavailable dates around blackouts — holidays, sold-out weekends, and personal time off are easier to manage when customers can’t request them in the first place.
- Use UTMs on every ad URL —
?utm_source=instagram&utm_campaign=summer-2026on your campaign links makes attribution in Cortado meaningful. - Re-copy the embed snippet after major changes — most updates are automatic, but if you’ve had the form embedded for a long time, grabbing the latest snippet ensures you get all the recent improvements.
Analytics
Track form performance with Google Analytics and Google Ads conversions.
Catalog
Manage the add-on items that appear on the Form Options page.
Leads Pipeline
Follow up on form submissions as they land in the New stage.
Slack
Get a Slack notification the moment a new inquiry is submitted.