

Contacts Overview
The Contacts page is your customer directory. It holds every person who’s reached out through your inquiry form or who you’ve added by hand, along with the leads, events, and companies tied to them.Cortado’s CRM is intentionally lean today. The contacts experience covers the essentials — a searchable list, a clean detail page, and links to the leads, events, and companies each person is connected to. Expect this to grow over time.
Contacts List
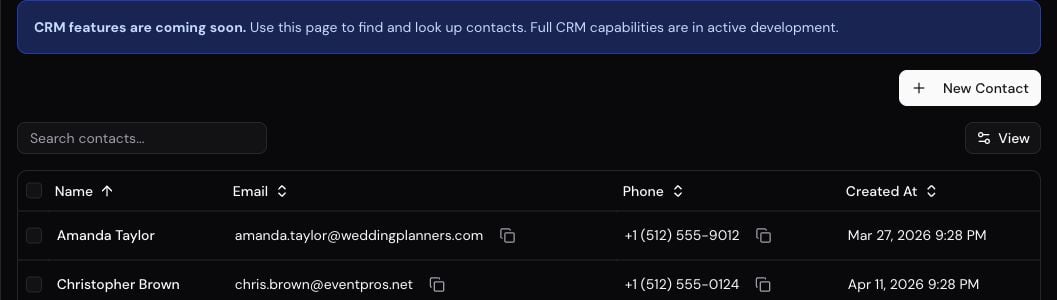
Find the Contacts page at CRM > Contacts. It’s a paginated table with four columns:- Full Name — the contact’s first and last name. Archived contacts show an Archived badge next to the name when you include them.
- Email — with a one-click copy button next to the address
- Phone — with a one-click copy button next to the number
- Created At — when this contact was first added
Searching
A search field sits above the table. Type a name, email, or phone number and the list filters in place. Clear the search to see everyone again.Show Archived
Archived contacts are hidden from the list by default. Check Show archived above the table to include them. Use Reset to clear both the search and the archived toggle.Bulk Selecting
Each row has a checkbox, and a header checkbox selects every row on the current page at once. Use this when you want to act on several contacts at the same time.Adding a Contact
The New Contact button in the top-right opens a side panel with four fields:- First name (required)
- Last name (required)
- Email (optional)
- Phone (optional)
Contacts Created Automatically
You don’t need to add every customer by hand. When a new inquiry comes in through your inquiry form, the person submitting it is captured as a contact automatically and linked to the lead.Contact Detail Page
Click any row to open the contact’s detail page. The layout splits into two columns of cards, with an activity area at the bottom.Left Column
Contact Information
The basics about this person:- Email — clickable to copy
- Phone — clickable to copy
- Created and Last updated dates
Companies
Every company this contact is linked to appears here, with the company name and any title you’ve set on the association. Click a company to jump to its detail page. See the Companies guide for how to link contacts to companies, including the automatic email-domain match for new inquiries.Right Column
Leads
Every inquiry tied to this contact, with:- Stage — current pipeline stage (New, In Progress, Quote Sent, etc.)
- Event date — when the requested event is scheduled
- Event count — number of events on the inquiry (for multi-event bookings)
- Most-recent quote total — the latest quote amount if one has been sent
Events
Every event tied to this contact, with:- Stage — Upcoming, Complete, Cancelled, Rescheduled, or Postponed
- Date — when the event happens
- Duration — how long the event runs
- Guest count — expected number of attendees
Activity Tabs
At the bottom of the detail page, an activity area lets you keep context on the relationship across four tabs:- Notes — internal notes about this contact
- Tasks — to-dos scoped to this contact, with due dates and assignees
- Emails — emails sent or received through Cortado for this contact
- Quote Interactions — every send, view, accept, reject, and expiration of any quote tied to this contact
Linking Contacts to Companies
Contacts and companies are separate records, and the link between them is what powers your CRM. You can connect them in two ways:- Manually — from a company’s detail page, click Add Contact and pick the contact you want to link. Each link can carry its own title.
- Automatically by email domain — when a new inquiry’s email domain matches an existing company’s website domain, Cortado links the contact for you. Generic providers like
gmail.com,yahoo.com, andoutlook.comare skipped, so this only fires on real business domains.
For automatic matching to work, the company must have a Website URL set that contains the matching domain. See the Companies guide for the full rules.
Archiving Contacts
Archive a contact when you no longer need them in everyday lists, but still want their history. Archiving is not the same as deleting — the person stays on past leads, events, quotes, emails, and company relationships. To archive:- Open the contact’s detail page
- Click Archive
- Confirm. Cortado explains that lists and pickers will hide the contact unless you turn on Show archived
- The contact drops out of CRM > Contacts and out of contact pickers (new leads, tasks, company links) unless Show archived is on
- An Archived badge appears on the contact’s name, and Restore replaces the Archive button
- Historical leads and events still show the person, with a Contact archived badge on those pages so you know they are no longer in the active directory
- Linked companies still list them, with an Archived badge on the company page
Archiving a contact does not archive their leads, events, or companies. Those records stay where they are.
Best Practices
- Add what you have, when you have it — even just a name and email is enough to start. You can fill in the phone and link a company later.
- Search before you add — Cortado doesn’t block duplicate emails, so a quick search on name or email keeps your list clean.
- Let the inquiry form do the work — every new inquiry creates the contact for you, so most of your directory will fill itself in over time.
- Set company website URLs early — once a company has a website, every future inquiry from that domain links itself, saving you manual entry.
- Use the Activity tabs as your memory — notes, tasks, and the email history on each contact make picking up a conversation weeks later easy.
- Archive instead of losing history — hide inactive people from lists and pickers without breaking past leads and events. Turn on Show archived when you need to find someone again.
Companies
Group contacts under the business they work for.
Leads Pipeline
Track each contact’s inquiries through your pipeline.
Activity
See how notes, tasks, emails, and quote interactions stay tied to each contact.